Delta V is Partnering up with ChiroHealth USA! Click to read more.
BFR Training is here!
Keto : The Key To your diet success?
The Keto Diet - it’s the talk of the town right now, and with good reason. It seems like everyone knows someone who has had great success with it. Just because someone else does well with it, does that make it the right diet for you? We’re going to explore some of the basics about the diet, as well as some of the important points to keep in mind if you are going to try it. As with any diet, there are exceptions to the rules - if something sounds like it’s not going to work for you because of an allergy, aversion, or other reason you have for avoiding a food or method… you know your body best.
What is the Keto Diet?
The Keto diet is designed to get you into a state of ketosis, which is where your body is using fat for fuel. Ketones are the byproduct of fat metabolism in the body, and are usually made in small amounts throughout a normal day. A diet that is aimed at creating a ketotic state is one that is designed to get you burning enough fat that there is a measurable output of ketones from your body. When you are in ketosis, it is a sign that you are utilizing fat as your primary fuel source throughout the day and therefor reducing your (presumably) excess body fat.
The Keto diet is not the only diet that is intended to get you into a state of ketosis. In fact, all weight management diets that are centered around weight loss are intended to get you into this state through one method or another. The Keto diet is different because it aims to get you into ketosis by consuming a very high proportional amount of fats compared to the other major macronutrients. The basis for this is when a high amount of fat is available for the body to use as fuel, it will switch to preferentially burning fat for energy instead of carbohydrates. The body usually attempts to burn carbohydrates and sugars for fuel (because the biochemistry is a lot simpler and takes less energy), so to make it burn fat instead takes some coercing.
A Quick Biochemistry Lesson (Macronutrients too!)
Macronutrients are the major energy molecules you have probably heard about before : Proteins, Carbohydrates, and Fats.
The body uses proteins as the building blocks for most processes by breaking them down to Amino Acids and recombining them as needed to make muscle, blood proteins, etc etc etc - the list is long. You can use protein as an energy source too, but it is a demanding process in terms of energy expended for energy gained and the byproduct (ammonia type chemicals in most cases) is not something you want a lot of in your body.
The body uses carbohydrates through a process called Anaerobic metabolism (meaning done without oxygen), and is able to break carbohydrates down into energy very efficiently. This efficiency is why your body will normally try to use carbohydrates for energy before other macronutrients, as it happens quickly and gives a decent return on energy gained for energy spent.
The real magic happens with fat metabolism. The body breaks down fats through Aerobic metabolism, which takes longer and is more taxing than the Anaerobic carbohydrate metabolism. However, once the fats are broken down and transformed into energy, the return of energy gained per molecule of fat is much higher than that of either carbohydrates or proteins. This means that your body is capable of doing a lot more work with the energy gained from fats once it breaks them down, but it takes longer and requires more chemical processes.
The summary of it is this : Carbohydrates cost 2 energy (ATP) to make and get you 6 energy, for a net of 4. Proteins also net 4 ATP. Fats that get broken down in the body net 9 ATP OR MORE, depending on the particular fat that is broken down.
Keto Nuts and Bolts
When eating this way, the goal is to make the majority of your daily caloric intake come from fats (between 70%-75%), followed by protein (15%-20%) and then lastly, carbohydrates (~10%). These are somewhat conservative numbers, with some extreme diet recommendations ranging up to 85% fat / 10% protein / 5% carbohydrates. Usually, to achieve a majority the diet is going to require a lot of oils, nuts, butters, and creamy textured foods.
This is difficult to do when also trying to follow a separate set of guidelines in conjunction with the Keto diet, such as vegetarian, nut free, lactose intolerant, etc. Difficult does not mean impossible, however, just that there will be more preparation and ingredient shuffling going on than the average Keto dieter will do.
One very important part of this diet that gets overlooked by some individuals is the vegetable content. The misconception as people begin to look at recipes is that the vegetables are either too high in carbohydrate content or not necessary. The truth is, vegetables in this diet are extremely important because they are the main source of dietary fiber as well as providing valuable vitamins and minerals. They also add much needed volume to the diet, as most high fat foods are very dense and do not take up much space. Without maintaining a healthy amount of vegetables on the Keto diet, it can be easy to eat too many dense, high fat foods in order to feel full, which translates to more calories than you need.
Some vegetables lend themselves well to this diet, usually the leafy greens and deep, dark colored vegetables. There are of course notable exceptions, such as cauliflower (which is a major staple for most Keto diet plans) and peppers. Often the brighter, more colorful veggies are lower in fiber and higher in sugar, which makes them taste sweeter but not helpful for Keto. The biggest and most popular examples of this are corn and carrots. A great breakdown of the net carbohydrates per food can be found here.
Another important part of this diet is selecting high fat foods that are healthy fats. The distinction between healthy and unhealthy fats is how saturated the chemical bonds of the fat are with carbon molecules. Unsaturated fats are generally considered the healthiest, and include vegetable oils, nuts, and avocados. Saturated fats should be approached with some caution to their quantity and what they are combined with, and include whole milk, butter, cheeses, meats, and coconut. Trans fats are the unhealthiest, and are usually found in fried foods, fast food, processed food, and anything labeled “partially hydrogenated”.

When doing a Keto diet and aiming for a healthy lifestyle, keep your fat selections to primarily unsaturated fat when possible, and saturated fats to complement the gaps. An unhealthy version of the Keto diet would be one that is composed of entirely saturated fats (red meat, cheese, cream and coconut) without any vegetables or unsaturated fats, such as avocados and olive oil.
Ketosis : Keep an eye on it
The Keto diet can be a tricky one for some individuals with existing health conditions. The diet was first studied in relation to epilepsy and helping to prevent seizures (which it does), but it also can play a large role in people who have been diagnosed with diabetes. While many cases of Type 2 diabetes will respond very well to a diet like this when coupled with exercise, individuals with Type 1 diabetes should consult their managing physician before attempting it. The danger lies in dropping too far into ketosis if the insulin levels are not controlled well and the ketosis is not carefully monitored, leading to a condition known as ketoacidosis.
Even in individuals without pre-existing health conditions, starting this diet can be challenging. Often people will experience the “Keto flu”, a nausea/headache/fogginess and decreased energy while making the transition into ketosis. As the body depletes it’s stored carbohydrates and is searching for more, your body will resist utilizing the stored fats for energy and you will seem like you are constantly running out of gas. Additionally, as you are using up your carbohydrates, you will be urinating most of your electrolytes out at first, so you may feel dehydrated, have brain fog, and get muscle cramps. A great solution to this is to stick closely to the diet for the first few weeks, supplement with a liquid electrolyte solution, and stay very well hydrated.
To make sure that the diet is actually doing what you think (and hope) it is, ketosis test strips are readily available at most pharmacies that you can use to check your levels. In order to stay safe but to maintain an overall fat burning state for energy, you want to stay at a +1 to +2 ketosis (the test kits will explain the grading system). Anything more than that is somewhat dangerous, while anything less than that probably will not help you reach your goals.
Key To a Keto Lifestyle
The biggest key to this diet, as with most, is consistency. The Keto diet in particular is not very forgiving to “cheat days”, as the body gets a taste for carbohydrates and quickly makes the switch to processing them for energy again. This can mean that after one cheat day you may notice increased water retention, some weight gain, and then having to go through a short period of the “keto flu” again before getting back on track.
One of the major keys to success here is preparation. The more that you can do to plan ahead, prepare meals for yourself beforehand, or check the menu where you will be going and see what options might fit the diet, the better you will be able to stay on track. This diet in particular is more difficult to succeed with when doing it on the fly, so bulk meal preparation as well as overhauling the ingredients in your pantry that you keep on hand will be extremely helpful.
Another key to the low-carb, high-fat lifestyle is being able to get back on track when you fall off the wagon. Inevitably everyone takes a cheat day, or can’t resist a slice of birthday cake, or whatever life throws at you. The most important thing with this diet (and nearly any other) is being able to enjoy the cheat meal, and then get back on track toward your goals.

Dr. Paul Harris holds a Doctor of Chiropractic degree from Texas Chiropractic College and a Master’s of Exercise and Health Sciences from University of Houston Clear Lake. He is the owner of Delta V Chiropractic and Sports Medicine and an avid human movement specialist.
Tension and Power Part 2 : Torque for better Chest Press
Last time we went over the basics of torque and power generation, talking about the lower extremities (full article here). This time we are going to focus specifically on the upper extremities and how to lock them into place and develop torque to create power in the chest press.
The hip and shoulder are both large, mobile joints with lots of freedom of movement. This ability to move is what enables us to interact so comprehensively with our world. Moving either one of these joints requires a coordinated effort of lots of different muscles all at once, both large and small. In the shoulder, the rotator cuff is the group of muscles that is largely responsible for the fine tuning of arm positioning for activities. The rotator cuff is also responsible for stabilizing the shoulder joint and keeping it strong when applying force through the rest of the musculature from the chest and core out to the arm.
Creating torque in the shoulder is done by using the rotator cuff muscles to tighten the shoulder joint and capsule, so that there is no “slack” to overcome before you are able to apply force. The direct application of force through the shoulder translates to increased efficiency, and in most cases, also translates to more strength and a lower risk of injury.
In addition to using the rotator cuff to tighten the arm, you also want to use some of your larger muscles to keep the shoulders lined up throughout the movement. The big players here are the back muscles - Lattisimus Dorsi, Rhomboids, and Trapezius. When you squeeze the shoulder blades down and back slightly, it further accentuates the torque and resistance of the shoulder as well as keeping you in a good position to generate power.
One thing to consider with this set up is that it is scalable for the level of resistance you are working with. When you are doing a maximum effort bench press, you want to think about squeezing everything as tight as possible to generate as much power you can. When you are doing this method for a series of pushups, it is less about squeezing everything as tight as possible on every rep (you will wear yourself out prematurely) and more about getting in the right position and maintaining a constant level of tension.
Torquing the Shoulder
To generate torque in the shoulder, you almost always want to think about rotating the arm outward.
This external (away from the body) rotation is an optimal condition for the common lifts you will do, like pushups and bench press. Below, I demonstrate full internal rotation of the arm (left) and full external rotation of the arm (right).


Screw it in
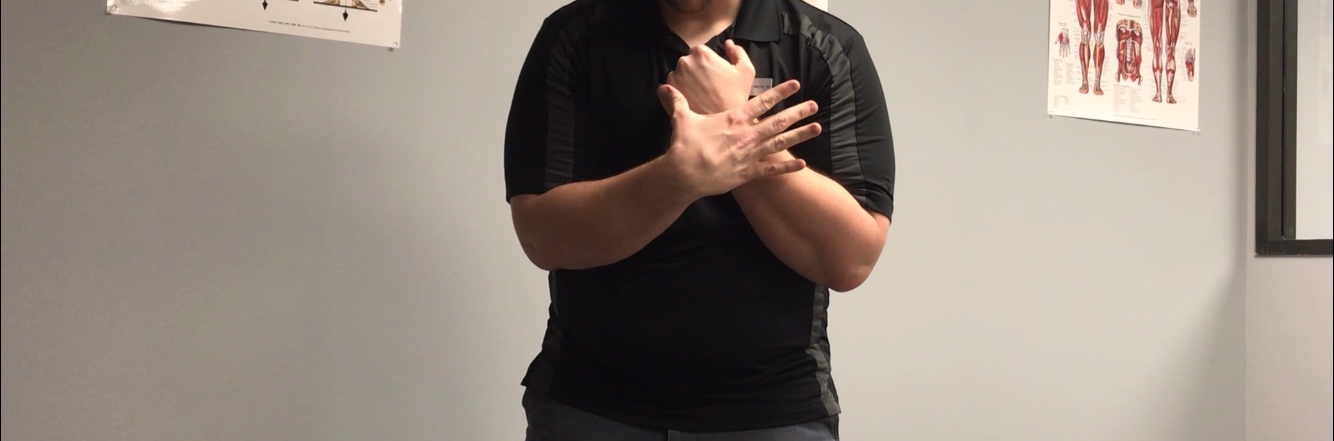
Similar to the cue with the legs, you want to think of screwing the hands into the floor/bar. This means twisting towards the pinky of each hand with the shoulder/elbow, not with the hands. A good way to practice doing this and getting the feel for it is to do it standing while leaning against a wall. Keeping the hand flat against the wall, turn the elbow as much as you can towards your body. It should feel tighter in the shoulder the closer you get to the elbow being pointed at your body. This is the feeling you are looking to recreate when torquing into place while loaded.
Below I demonstrate what you are looking for in the pushup position. Elbows pointed out and shoulder not tight on the top line, elbows pointed back with tight shoulders on the bottom.


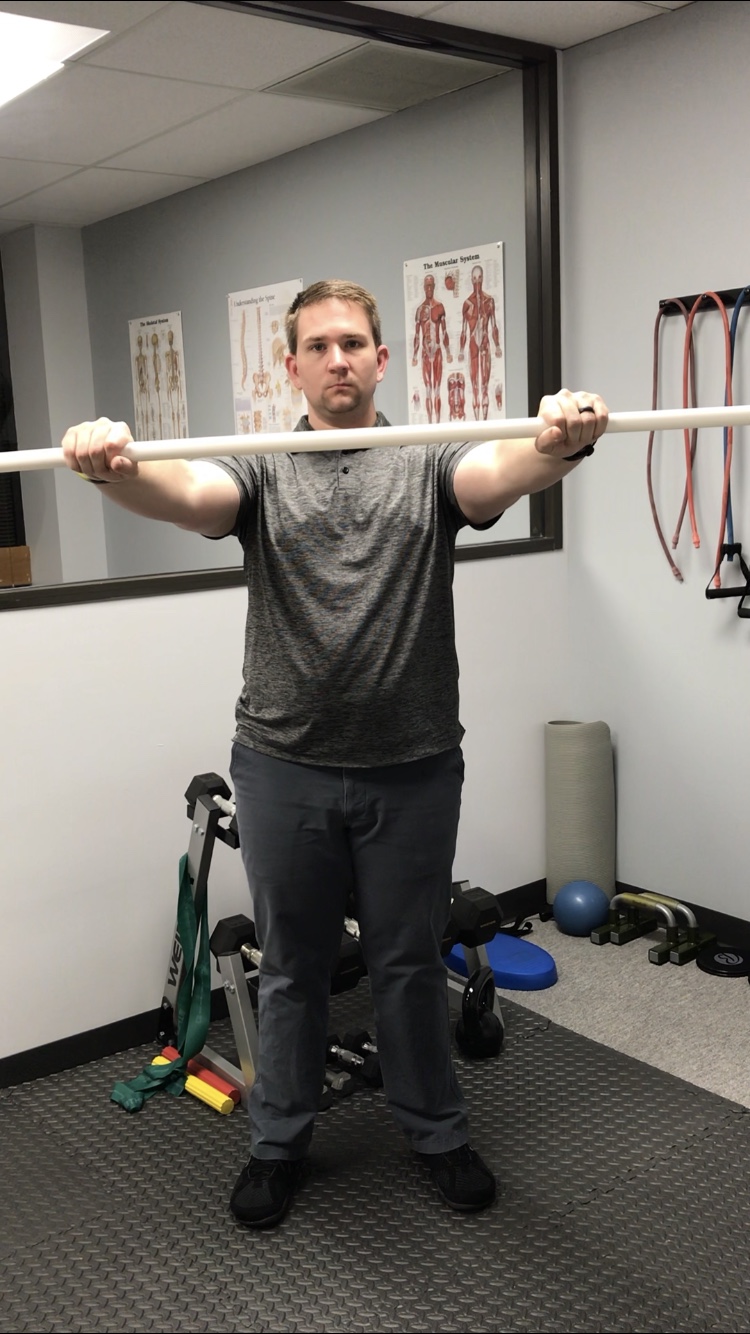
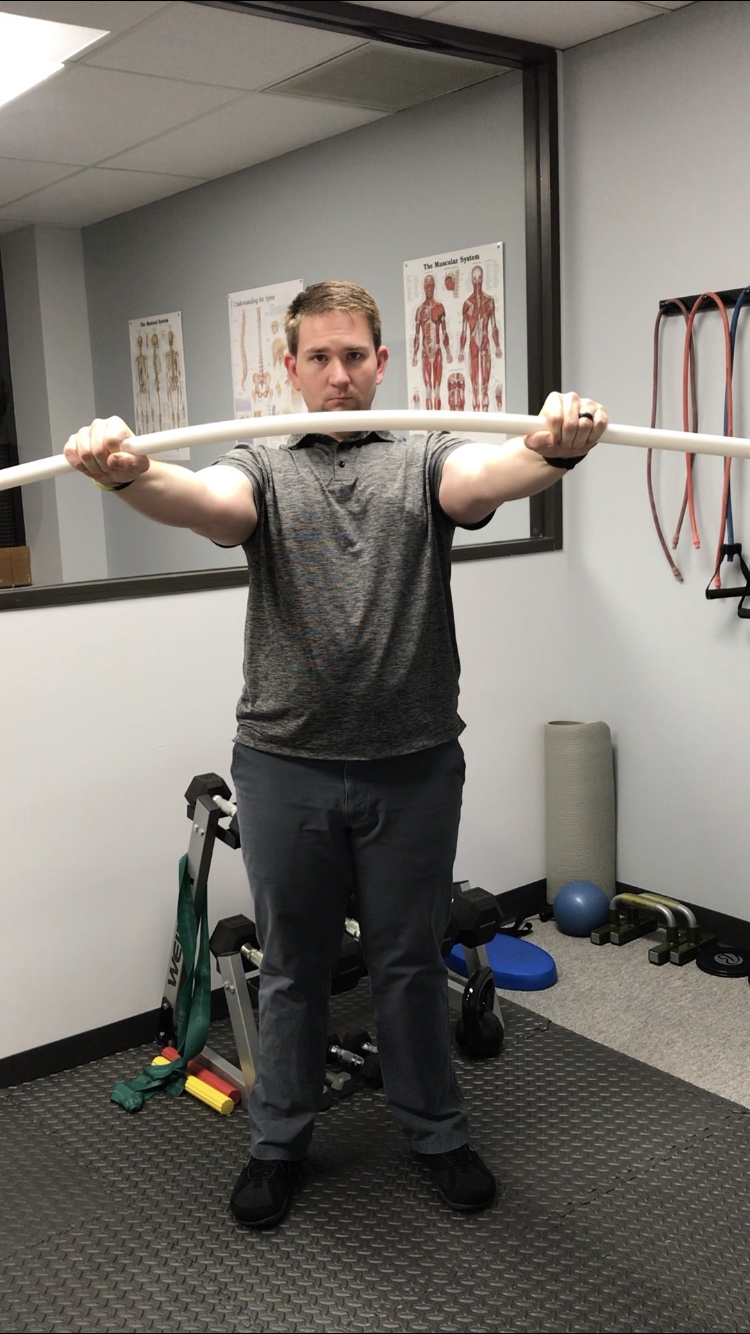
For a barbell motion, once you have established your grip on the bar, you want to think of trying to bend the bar like creating a hill between your hands. The bend should be towards your head, not towards or away from your body. You (most likely) won’t actually bend the bar, but that’s not important - what is important is that you squeeze the muscles as if you were going to bend it.
Below I demonstrate this concept with PVC so you can see the bend being created.
Down and Back
Squeeze the shoulder blades down and slightly back to start using some of the big muscles of the back.
It should feel a little bit like sticking your chest out when you do it correctly. Try to keep the shoulder blades locked down and back in this position throughout your movement.
Tighten the arms
Once you have screwed the shoulders in place, you want to tense your arm muscles and create resistance. If you think of the elbow as a spring that’s about to be compressed and then bounce back, you are adding resistance to that spring to make it stronger.
Deep breath
Take a breath in and squeeze the abdomen, like you are going to try to do a crunch or sit up motion. When you increase the pressure in the abdomen and engage the core musculature, it makes everything else stronger moving outward from the core.
Drop down
As you drop the weight down (whether that is your body toward the floor or a bar toward your chest), think of it as dropping into position to push. This first phase of the movement should be smooth and almost feel effortless if you have created the right torque and tension conditions.
As your elbows bend, try to make sure they are pulling in towards the body, usually at about a 45 degree angle when dealing with heavy loads.
Push!
Now that you have all that torque, tension, and weight in front of you, push it away from you and return to the start position.
When done right, this method of pressing should not only increase your power output but also help reduce shoulder pain associated with pressing motions. That makes the set up a win-win situation for anybody who wants to keep doing this type of exercise long term. Of course, if you are still dealing with shoulder pain and issues with your press even when doing the right set up, you should seek out help from a professional.
Leave a comment below and let us know what you think about generating more power in your chest press.

Dr. Paul Harris holds a Doctor of Chiropractic degree from Texas Chiropractic College and a Master’s of Exercise and Health Sciences from University of Houston Clear Lake. He is the owner of Delta V Chiropractic and Sports Medicine and an avid human movement specialist.
Best Exercise Choices for Weight Loss
It’s the new year, which means a lot of people are starting to say “what was I thinking with that new year’s resolution?” right about now. If your resolution is to finally lose those pounds you have been fighting with forever, here is the next step in your game plan.
Every time you say you want to lose weight, what you are probably looking to lose is FAT, not POUNDS. What the bathroom scale tells you is a general summary of where you are (total body weight, or TBW), not a detailed report of your health. If your goal is to be healthier, more fit, leaner, etc, then what you are looking for is a reduction in body fat weight (BFW). What is left after accounting for BFW is your lean body mass (LBM) or muscle, and of course skeleton and organs.
The best strategies for reducing BFW include: healthy dietary changes, increasing LBM, and creating an overall calorie deficit, in that order. Creating a calorie deficit is when you burn more calories in a day than you consume through food intake, forcing your body to utilize stored energy. Making healthy diet choices will help you create a calorie deficit both through eating less calories and eating smarter calories. In all honesty though, almost nobody enjoys making the lifestyle changes that are entailed in a “diet”. Increasing LBM and using up those calories throughout your day or through your workouts is the fun part, so let’s talk about that.
Why more Lean Body Mass is a good thing
Muscle tissue requires energy to function. Because of this, you can think of it as running hotter than fat tissue.
Look at it like this : between a running engine and a gas tank, which would you expect to generate more heat and do more work? Your body is designed to create the biggest gas tank it can in order to enable you to do more things. Voila, fat storage system!
Every day, you burn a certain number of calories doing normal body processes (like breathing and walking around) without thinking about it. This is called your Resting Metabolic Rate, RMR. Every other thing that you do throughout the day creates your daily metabolic requirements, often expressed as how many calories you need for a given day. For reference, the labels on the back of every packaged food item refer to percentages of a 2,000 calorie per day diet for a 185 lb male. This was considered the “normal” back when the guidelines were put in place.
Lean body mass is important in this conversation because it has a higher metabolic rate than fat does. One pound of fat consumes two to three calories per day, while one pound of muscle consumes seven to 10 calories per day. So if you can either add to your LBM or increase your overall RMR, you burn more calories without having to spend extra time doing mindless cardio.
Another important point is that muscle is more dense than fat is. One pound of muscle is approximately the size of a tangerine, while one pound of fat is approximately the size of a grapefruit. The density difference between the two tissues is only approximately 20%, but that difference is significant when visualized side by side. That means that while the scale may not always show the work that you are putting in, body size and composition should change as you continue to follow your plan.
Best Method : LBM
The best method for increasing LBM is to lift weights. Specifically, to lift a weight that is above and beyond what would be considered normal and customary throughout your day. Lifting weights, especially heavier and challenging weights, encourages muscle growth and increases LBM. If you need help picking a plan, find a trainer or coach who can help you create a roadmap for gaining muscle mass. Get out there and move some heavy stuff!
Best Method : RMR
The best method for increasing RMR throughout the day has been shown to be Interval Training. Often, this is interpreted specifically as High Intensity Interval Training (HIIT) workouts, which have been shown to increase your metabolic rate. In a recent study from 2017, interval training increased RMR by approximately 2.5% after 4 weeks of training.
You can, however, do interval work without dedicating the whole workout to HIIT. Starting with as little as 5 minutes of intervals at the end of your workout is enough to boost your metabolic rate by about three times as much as conventional cardiovascular exercise. One study showed increased performance from a group of cyclists who performed a 20 second on, 10 second off interval seven times compared to a group who rode continuously for 60 minutes. That’s 4 minutes of total work versus 60, and the 4 minute group showed better improvement in fitness.
Intervals can be performed with any exercise, with little to no equipment necessary. Choose an exercise, perform it for a short time with extreme intensity, then rest for a set amount of time. Often a good starting point for intervals is a 2:1 rest to work ratio, such as 20 seconds of sprinting and 40 seconds of walking or light jogging.
No matter what combination of exercises you choose, if your goal is to be more fit/healthier/leaner, use a tape measure to keep track of your body measurements along with the scale. Checking your measurements and how clothing fits over the course of a training cycle will give you a better idea of how your body composition is changing and evolving than weight alone.

Dr. Paul Harris holds a Doctor of Chiropractic degree from Texas Chiropractic College and a Master’s of Exercise and Health Sciences from University of Houston Clear Lake. He is the owner of Delta V Chiropractic and Sports Medicine and an avid human movement specialist.
Plyometrics Part 2 : Programming Plyos into your workout
Last time we covered plyometrics, it was all about what they are and how they work (full article here). This time, we can jump into the fun part - how can you start using them in your training cycles right now.
Plyometric Progressions
Because they can be so high intensity, finding the right place to start on the progression spectrum is important.
On average, the progression goes like this : start with two legs, then one leg, then add extra resistance. We further separate it into impact levels, height, direction, speed, and timing of repetitions. See the chart below for breakdown examples.
Of course, these are not the only example of exercises that are involved in plyometrics progressions. This is a progression for two legged jumping for the squat movement pattern. Instead of a step by step diagram, think of this as a conceptual guideline for choosing the exercises you like best or might help you the most.
Always start with the lowest impact activity on two legs and work toward progressively more difficult versions. The moment of highest impact is always coming back to the ground, especially with added height or momentum. The less time spent on the ground, the higher the intensity.
Training Cycles
So, you have a framework for putting together the progressions. Now you need to decide what will be the most beneficial. I’ve listed a few of the most popular training cycles that people use below, and what plyometric progressions will be the most helpful during that training cycle. There is not a mid-season or cross training cycle listed below because plyometrics programs are supposed to be HARD.
Hypertrophy & Growth
You want to do A LOT of plyos. Think of a big number, then add some more to it. The key here is to make sure that because they are high volume, they are not super high intensity.
This means hopping and skipping, low or medium box jumps, and other movements that use large muscle groups. Stay away from extra loads, great heights, depth drops, and small muscle group plyometrics (like jump ropes). Keep your rest periods relatively short, but rest between your sets. You want a deep burn in the muscles, but you shouldn’t be dying for breath before you start the next set.
Metabolic Conditioning
You want to do plyos that are controllable enough to add in bursts of intensity. Especially when conditioning for weight loss, doing intervals is important.
Your plyometric exercises should be mostly small muscle group exercises such as agility ladders and jump ropes mixed with bursts of high intensity, like a few big box jumps. You also want to keep your rest periods short and stay in constant motion as much as possible. The plyos for this cycle should be burners for the whole body and lungs.
Strength Consolidation
Your goal here is not to overdo the volume or the intensity, so you can recover between workouts and continue gaining strength.
Putting in plyos that are relatively low volume (think 8-10 reps per set) and high intensity is the way to go. Don’t add extra resistance here, but do try to push for distance/height with your plyos. Get plenty of rest between sets, and don’t rush the reps.
Power Generation
In this cycle, you are already doing a lot of explosive, low repetition work with your other lifts and your plyometric progressions should match that.
That means low reps, extra resistance to make them more effective, high speed for each rep, and lots of rest between sets. The big compound movements are going to be the best choices here, using the large muscle groups. Be careful managing your impact with these progressions - don’t use added weight for exercises that change elevation or add distance.
This should let you get started right away putting plyometrics into your workout plan. If you want specific advice on how to do that, feel free to leave a comment below or get in touch with us directly.

Dr. Paul Harris holds a Doctor of Chiropractic degree from Texas Chiropractic College and a Master’s of Exercise and Health Sciences from University of Houston Clear Lake. He is the owner of Delta V Chiropractic and Sports Medicine and an avid human movement specialist.
Unlock Your Wrists : The Weak Link In Your Pressing Motions
Unlock Your Wrists - The weakest link in your Press
Ever think about how the strength from the big muscle groups in your body gets transmitted into the world to accomplish a task? Your feet in contact with the floor, your ankles, knees, and hips bending just so in order to balance a weight and move it. Your hands gripping securely, wrists, elbows, and shoulders lined up in just the right angles to get something where you want it to go even if it resists. If you have a weak link in either of those chains, then the whole task is less effective. Today we’re talking about wrists, specifically.
Wrists are a small but extremely pivotal link in the chain from your shoulder to your hands. These little guys are responsible for a lot of shock absorption and helping to position and balance everything where it needs to be for you to do almost anything with your upper body. Your wrist is actually a complex joint made up of eight small bones (called your carpals), connecting the two bones in your forearm to the five bones of your hand. All told, that means 15 different bones are involved in each wrist to some extent.
There are also a few major landmarks that are extremely important in the wrist that can hamper your daily life, much less your athletic performance, if anything goes wrong. The wrist is home to a large cartilage shock absorber (called the triangular fibrocartilage complex, or TFC) as well as all the nerves, blood supply, and most of the muscles of the hand.
How do you keep them happy and healthy? You do that with strength, flexibility, and good technique.
Strength
Hand, arm, and grip strength are big factors in how well your wrist can handle shock, impact, and load. Farmer’s carries, hanging from a bar for time, and deadlifting (or other pulling exercises) WITHOUT supportive devices like straps are all great ways to build up the strength in your hands.
Flexibility
Keeping the range of motion in the wrists full and supple will decrease the likelihood of injury and discomfort. Below are a few examples of how to do that.


Good Technique
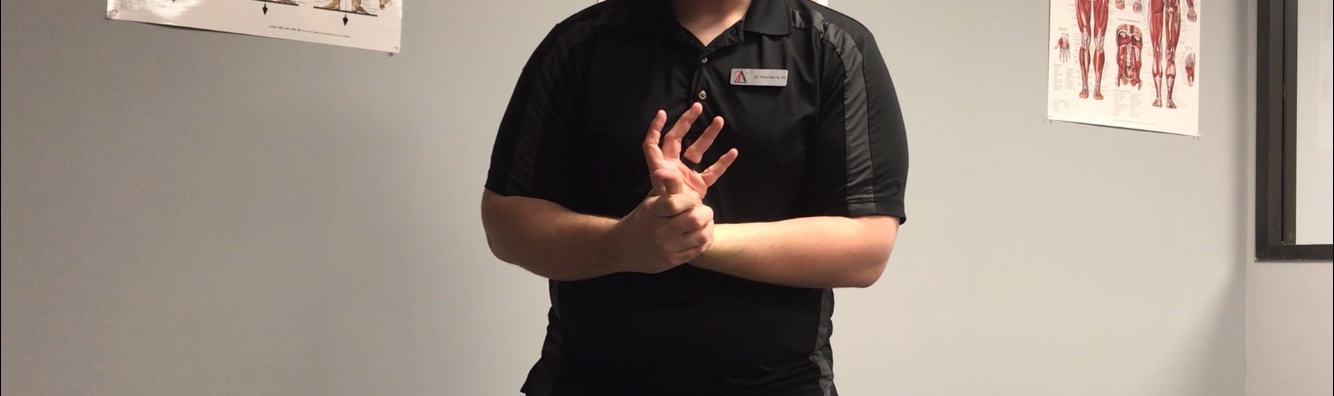
For bench press and overhead lifts, where you place the grip in your palm makes a big difference in the load on your wrist. You want to place the grip tightly in towards the web of the palm, so that when you go to press it should look like a punch being thrown. Another easy metric is you should not be able to see the full flat of the back of the hand when you look at it. This positioning allows the bones in the wrist to stack more and transmit force directly into the arm, without extra strain on the wrist joints themselves.


Still have issues or pain with your wrists even after trying some of this? Leave a comment or get in touch with us and I can help.

Dr. Paul Harris holds a Doctor of Chiropractic degree from Texas Chiropractic College and a Master’s of Exercise and Health Sciences from University of Houston Clear Lake. He is the owner of Delta V Chiropractic and Sports Medicine and an avid human movement specialist.
Plantar Fasciitis and You : Myths and Tips
I think nearly everyone seems to know (or have some idea) what plantar fasciitis is. Some of the explanations and definitions I have heard from clients have been extremely variable, though. Plantar Fasciitis, as a diagnosis, is by definition an irritation and inflammation of the strong, thick connective tissue on the bottom of the foot. It is usually a tight, sharp pain that’s worse when you take a step, and especially bad first thing in the morning when the foot has been elevated all night. Let’s take a minute to debunk a few myths about plantar fasciitis.
You cannot “roll out” your plantar fascia … thankfully
Some treatment plans involve using rollers, golf balls, or other at home massage tools to massage or roll the bottom of the foot in an attempt to help with the pain. While this can be helpful because you are using some kind of pain relief or tension relief method on an inflamed body part, you are definitely not going to physically stretch it out. The plantar fascia is one of the thickest, strongest, most durable pieces of connective tissue in your entire body. It is designed to literally support all of your body weight being placed on it and more. The amount of pressure you would need to stretch that tissue is not only unrealistic, but would cause injury.
Orthotics and night splints are not the best options out there
People who suffer from plantar fasciitis are often told that an orthotic insert and a splint at night are the only things that will help them. In the cases I have seen, an orthotic is usually not helpful at all. Many of them are overpriced, extremely stiff and unforgiving, and designed to recreate an “ideal foot” that isn’t realistic. These orthotic inserts are most definitely not going to be the long term solution for 99% of people. For clients in pain, I recommend finding a gel insert or a cushion for a few weeks that can help relieve the inflammation in the foot while we work to fix the problem.
Plantar fasciitis is NOT a lifelong condition
I cannot stress this one enough. Some people seem to think that once you begin having pain from plantar fasciitis, that it’s permanent and you have to learn to live with it now. This doesn’t need to be the case. Most people need to change whatever the stimulus is that’s causing them to have the irritation and inflammation in the first place. Sometimes that could mean a change in footwear choice; a change in activity style, strengthening part of the leg/ankle/foot; or improving mobility in the leg/ankle/foot.
Just like any other inflamed, irritated “-itis” condition, if you can find a way to reduce inflammation and pain then you can begin to fix the root of the problem. All of the at home and DIY remedies for Plantar Fasciitis should be focused on getting to a point where you can figure out what is perpetuating the condition. Here are a few tips for starting to get the pain under control.
Use a frozen water bottle
If your plantar fasciitis is freshly irritated and coming on with a vengeance, this tip is for you. Take a standard 16 oz. disposable water bottle and freeze it. When it’s solid, take it out and roll it back and forth under the foot like a massager for no longer than 10 minutes. It should help alleviate some of the pain, and is a method that it easily reusable.
Use deep, moist heat
If the pain has been a nagging problem for a while, use a microwavable hot pack and place it on the bottom of the foot and the bottom of the leg behind the heel (just above the ankle bones). Use whichever hot pack version you like, whether an at home bean bag or a store bought specialty pack. I do recommend placing a damp washcloth between the heat source and the skin - the moist heat will penetrate deeper into the tissues, warming them up and helping relieve tension.
Stretch your ankle and calf
Stretching both the lower and upper calf and ankle can help immensely with beginning to relieve pain from plantar fasciitis. See below for examples of how to do it. Do not exceed 30 seconds at a time per stretch, but feel free to do it as much as needed to begin feeling some relief of pain/tension/tightness.

Gastrocnemius stretch
Standing with the knees straight, elevate the toes on a surface and lean forward over the front leg. You should feel the stretch in the upper to middle portion of your calf.
Soleus stretch
This stretch should be felt lower down in the calf than the “normal” calf stretch (the gastrocnemius stretch above). When doing this stretch, try to keep the toes pointed straight ahead and don’t let the knee cave in toward the body. See below for how to set for the stretch.
Standing or kneeling, begin with your toes approximately 3 finger widths away from the wall.

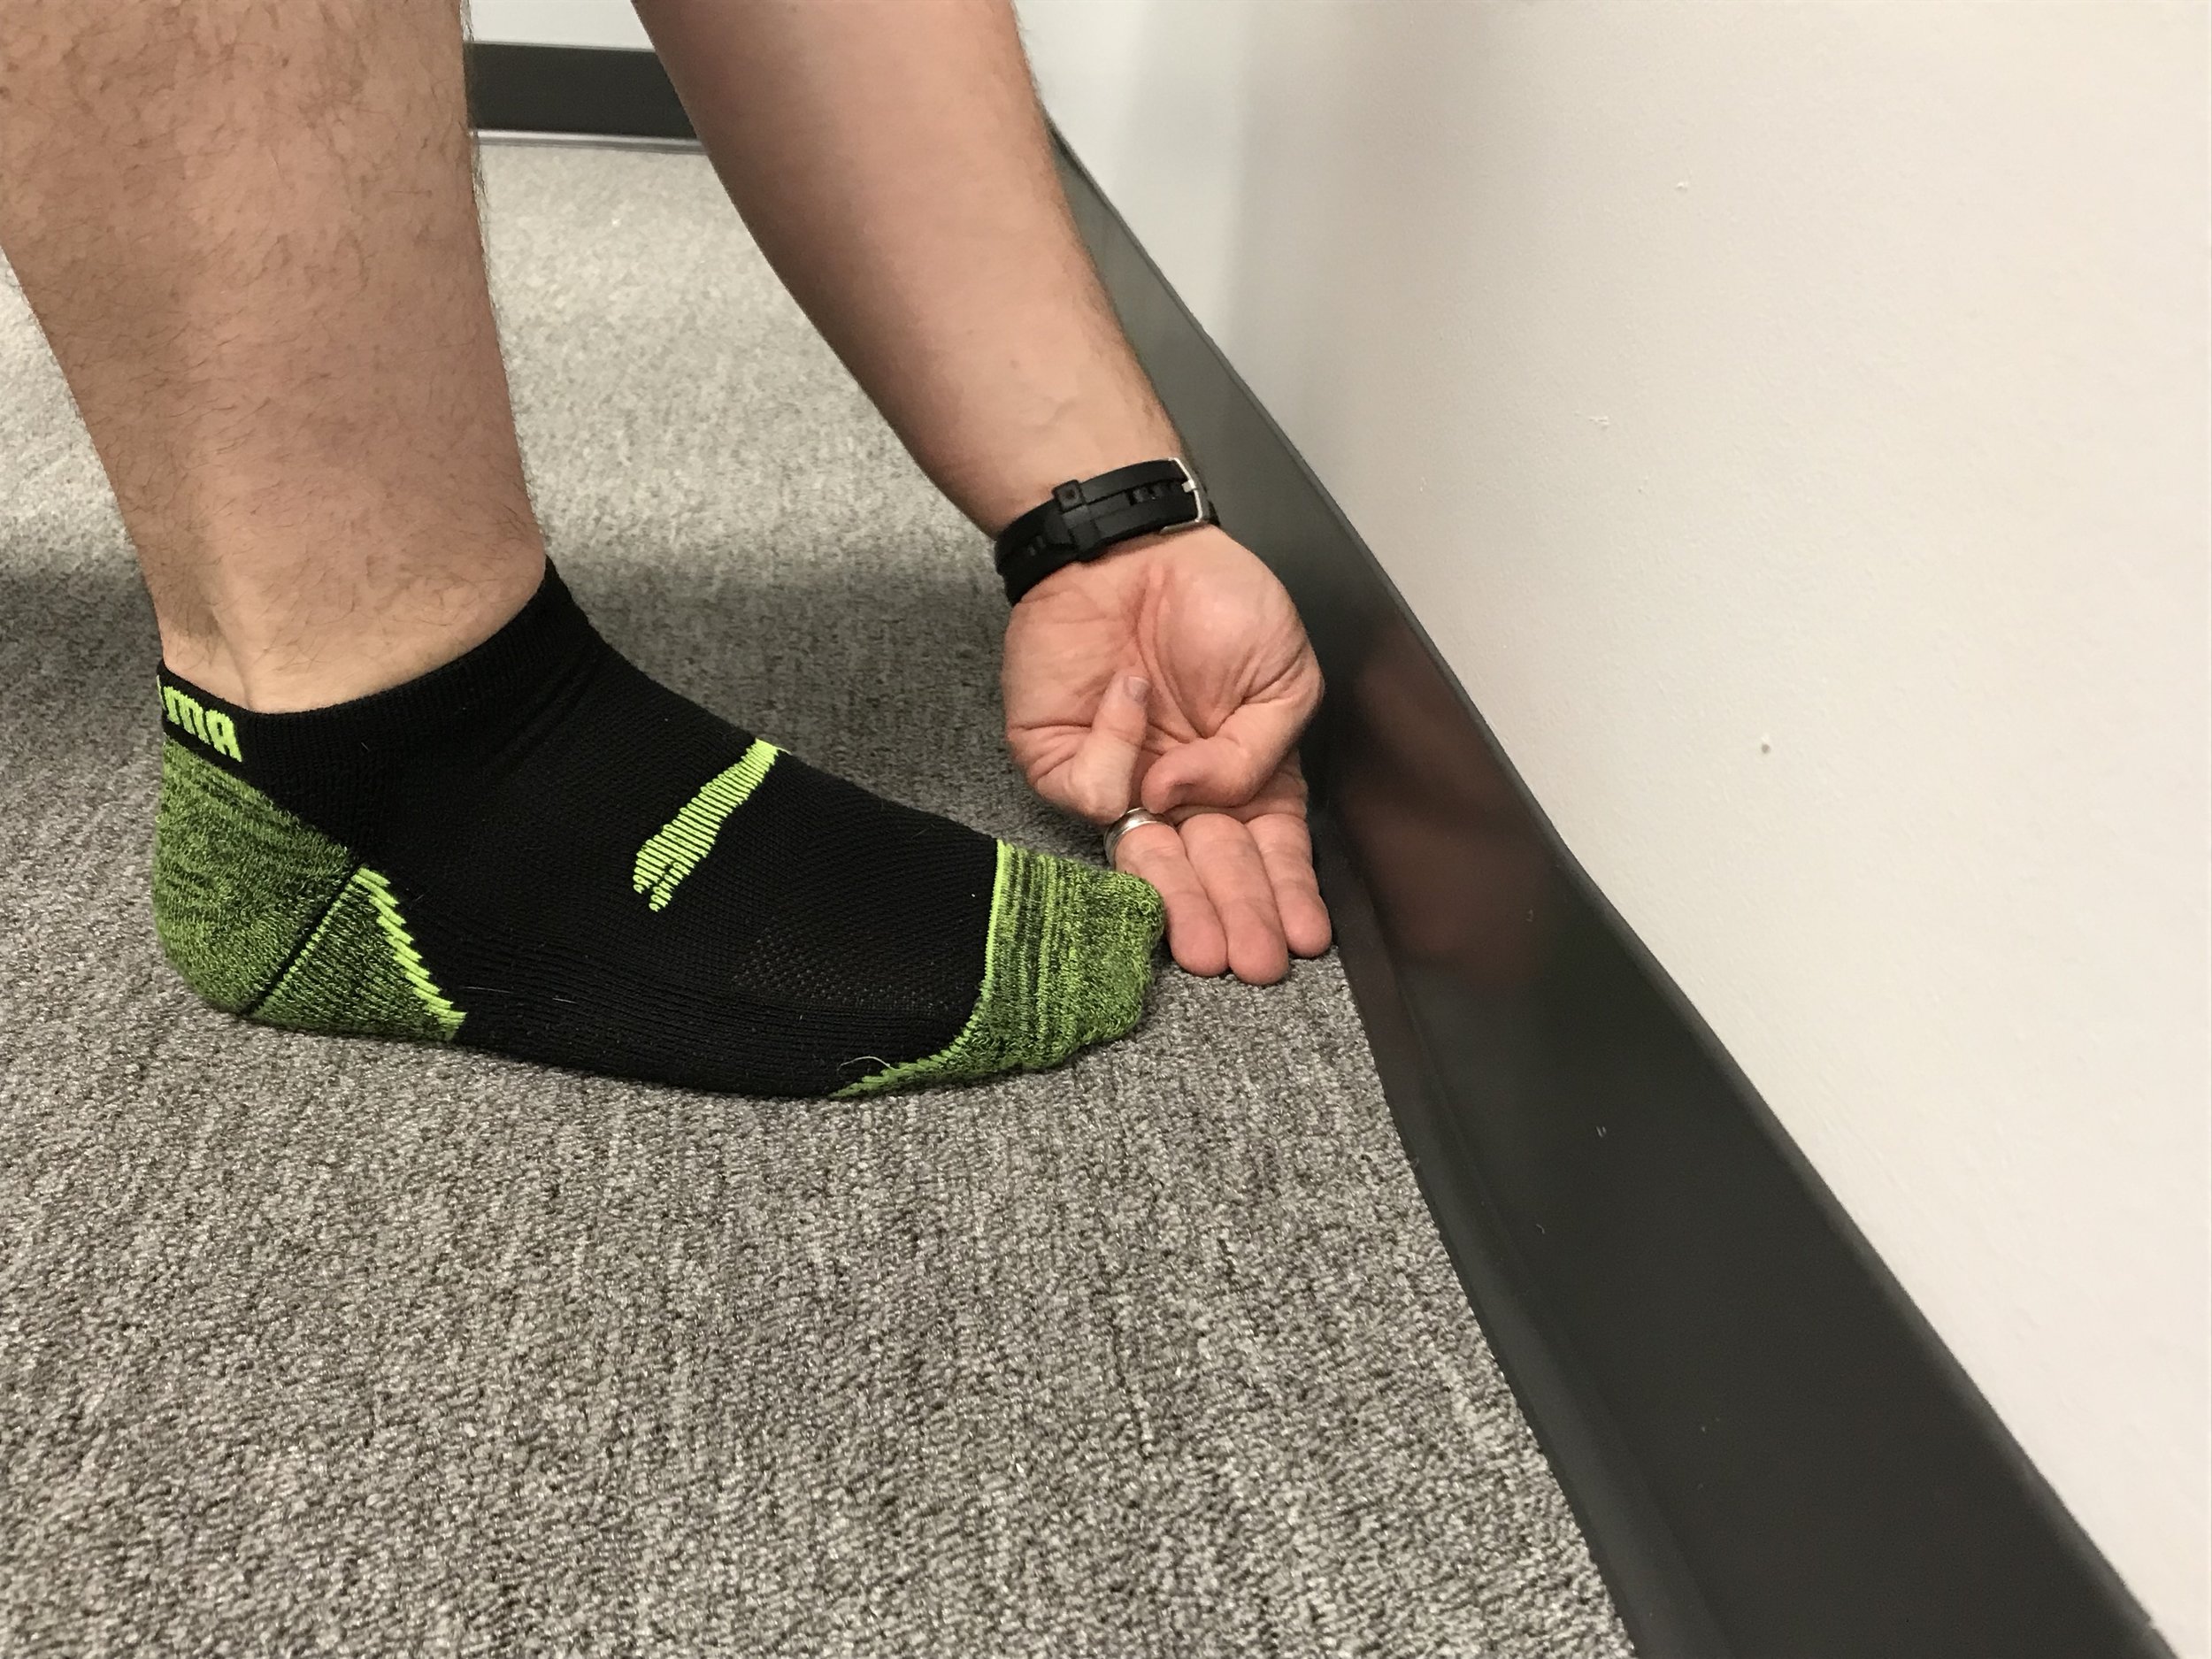
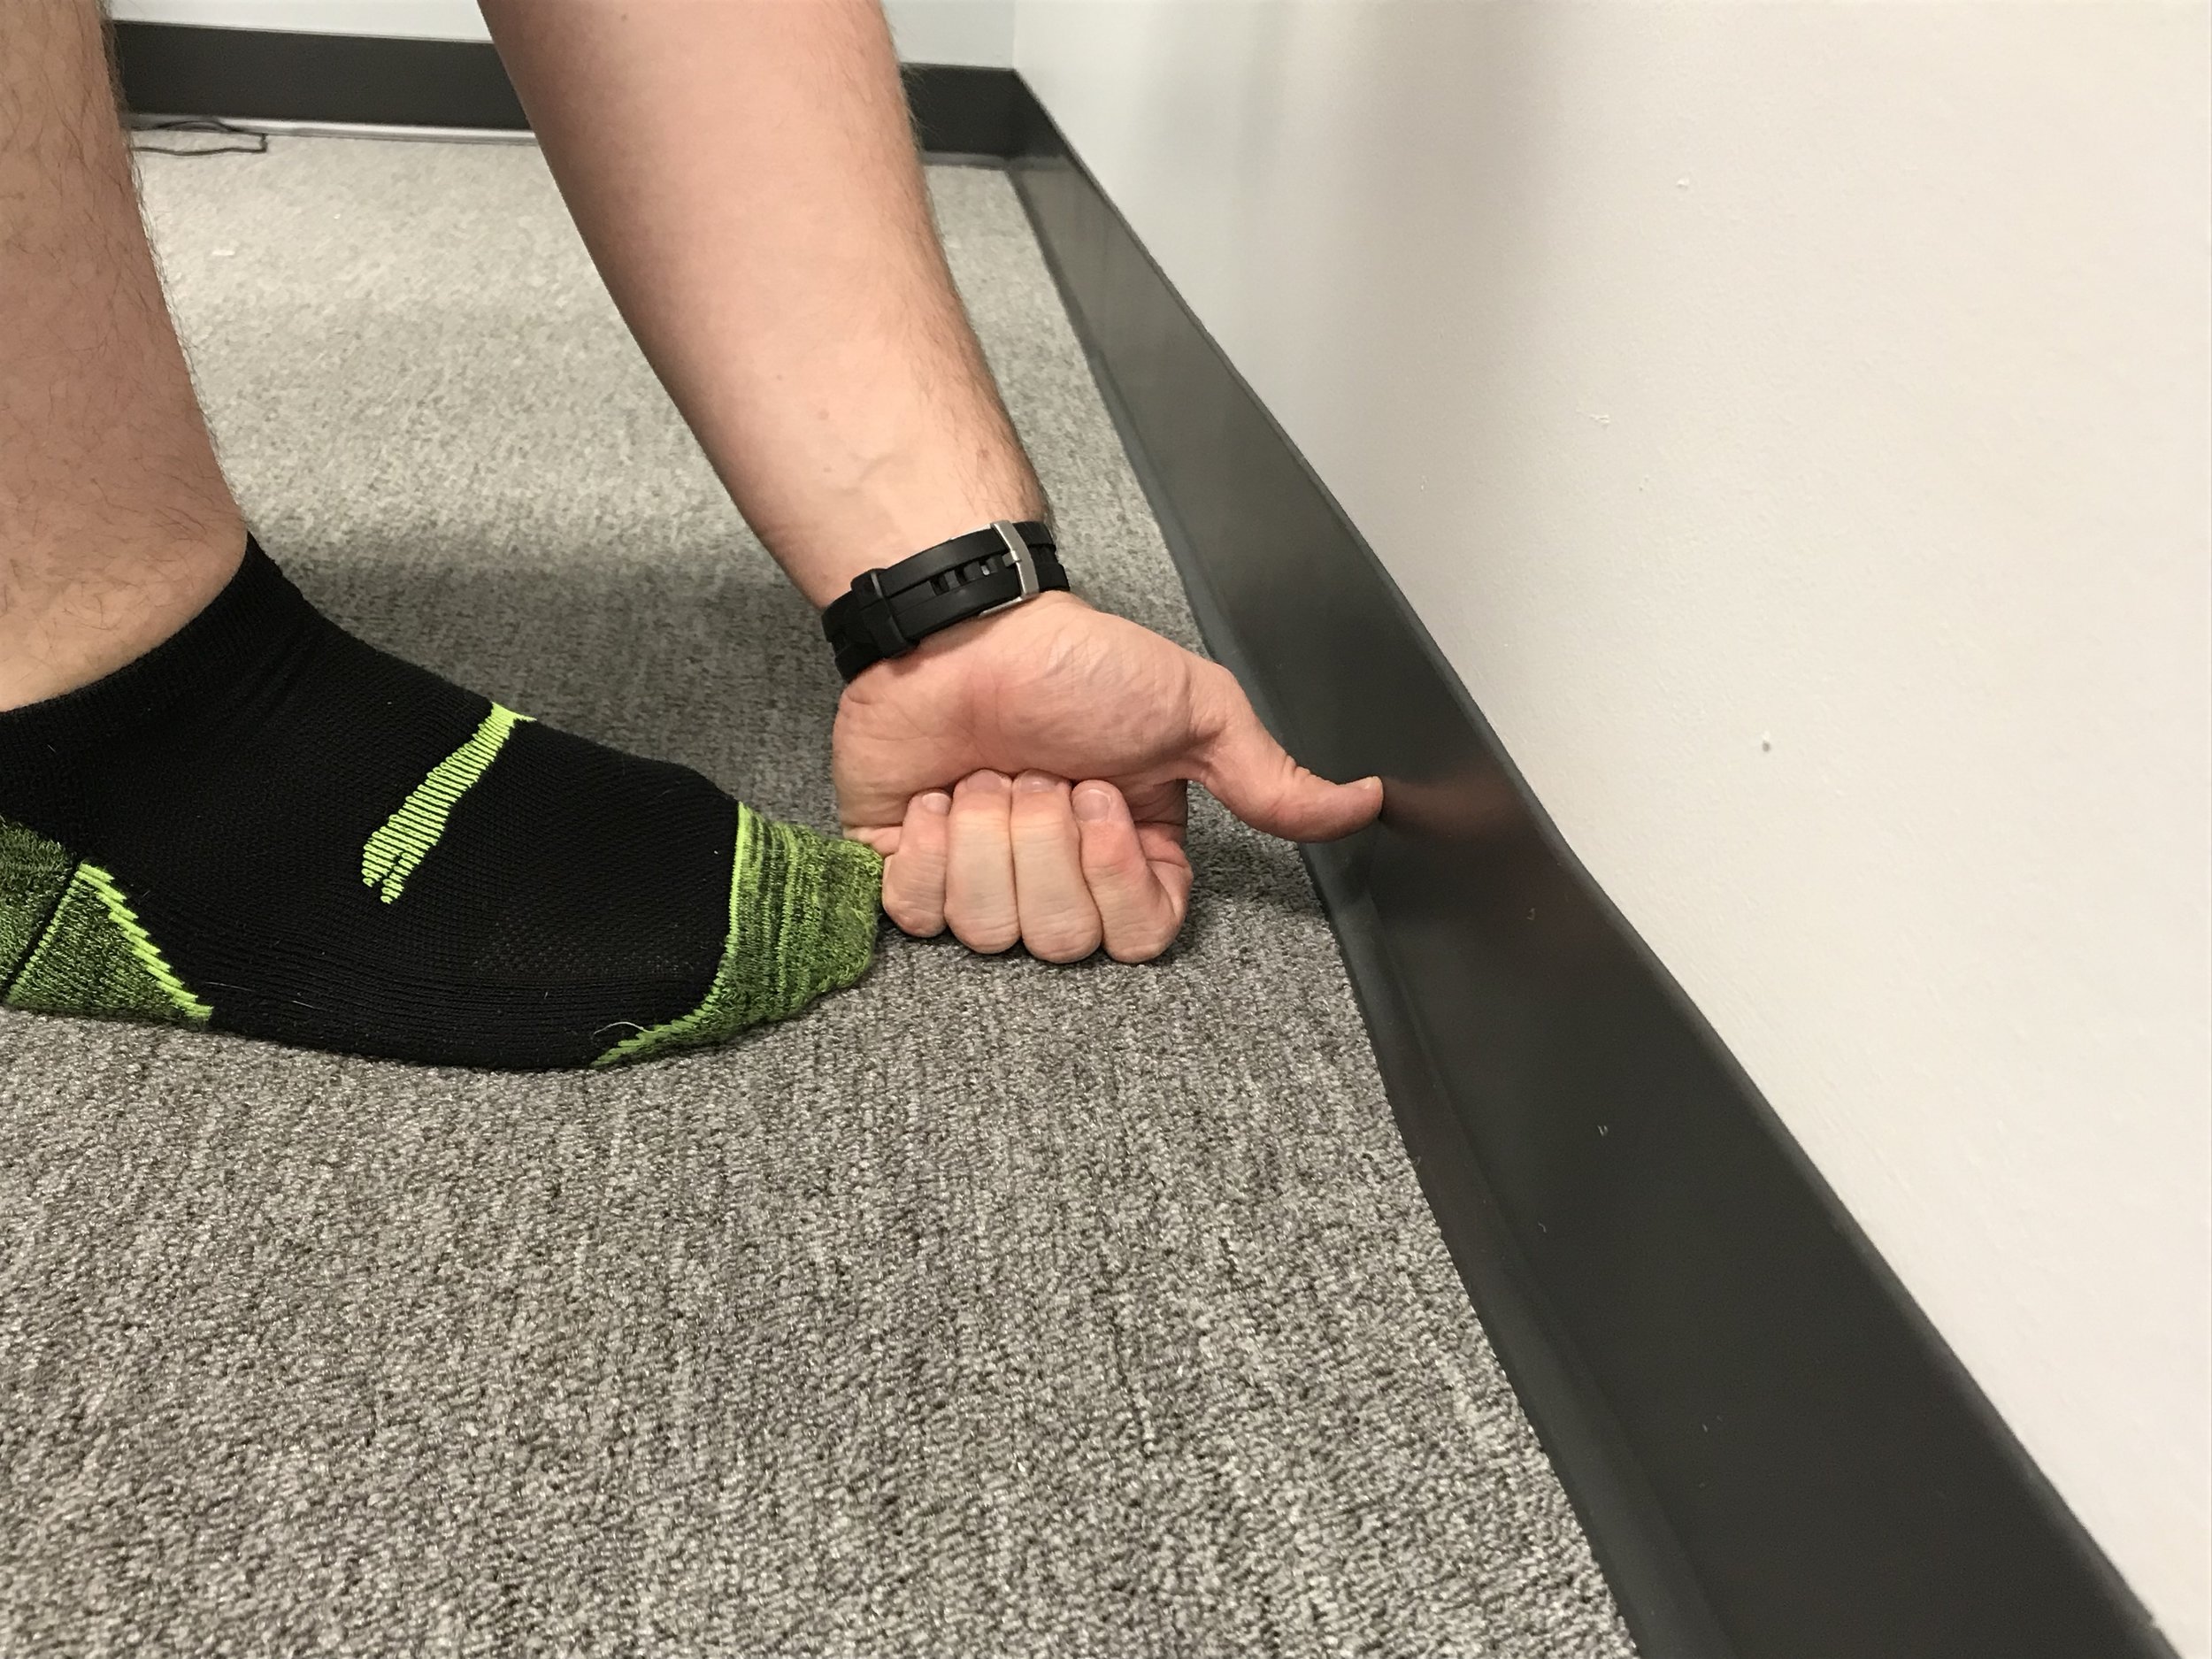
Drive the front knee towards the wall, leaning over your front foot while keeping the heel down. You should feel the stretch in the lower portion of the calf and ankle, but no pinching or pain. The goal for this stretch is to be able to reach the wall with the knee.

Optimal distance for this is about 5 inches, or one fist with the thumb outstretched.
This stretch is often overlooked and can help alleviate the pain associated with plantar fasciitis, especially if this particular muscle is part of what’s limiting your range of motion and leading to the irritation of your foot.

Dr. Paul Harris holds a Doctor of Chiropractic degree from Texas Chiropractic College and a Master’s of Exercise and Health Sciences from University of Houston Clear Lake. He is the owner of Delta V Chiropractic and Sports Medicine and an avid human movement specialist.
Tension and Power part 1 : Creating Tension for Better Squats
Tension : Not just for awkward family gatherings.
But really, tension is a great companion to have when it comes to picking up heavy stuff. Pre-loading and using tension is essential to being able to fully utilize the strength you already have. Generating tension can be done by using the small, stabilizing muscles of the large joints (shoulders and hips) to get into strong positions for the joints. When you do this pre-positioning, you should begin to feel a tightness and it will take effort to maintain. I’m getting ahead of myself though - let’s talk about why you want to do it in the first place.
Power Generation
and
Pain modulation
In many cases creating tension goes a long way towards reducing or relieving pain as well as helping you generate more power when performing your lifts or movements. When working with clients who have pain with squatting, one thing we cover is proper positioning and creating tension at the top of the movement before going to squat. Sometimes this simple change is enough to eliminate the pain before making any other fixes. Another reason you want to start using tension in your lifting and exercise regimens is it helps you generate more power. A lot of people are on the bandwagon for this, but not everyone seems to understand why or how.
One component of creating tension is getting into a pre-load position and using stabilizer muscles. When you activate and squeeze the small stabilizer muscles of the large joints and get into the pre-load positions, you create the most efficient and strongest mechanical advantage that you can. When doing this with the lower extremity, the tension position lines up the foot to be a contracted double arch; the knee to be a smooth sliding hinge; the hip to be a supported, stable hinge; and the lower abdomen to be a stiff, stable platform with which to handle the load. When each joint is working at it’s most efficient, you don’t lose excess energy trying to compensate for poorly moving parts. Particularly when dealing with knee pain while squatting, a great example of energy loss is the knees caving in while descending or ascending. Not only does it expose the knee joints to unnecessary risk of injury, but you have to expend extra energy to move the knees back into position and stabilize in order to stand up.
Try this
Scroll down to the photos and check out the examples of leg positions. Try squatting the wrong way (a little over exaggerated) and then do it the proper way. Doing it the second time should feel considerably smoother and easier to do.
Another BIG component of creating tension is abdominal bracing. Abdominal bracing is when you tighten the muscles of the abdomen and tilt the pelvis into a neutral position at the same time. Think of it as a combination of squeezing your stomach as if someone were about to punch you in the gut, and flattening the curve of your lower back at the same time. When you brace the abdomen, it increases the pressure inside your abdomen. Increasing this pressure has been known to increase your ability to move heavy loads because of physiological changes that occur in your circulatory and neurological systems. It also lets you move heavy loads because you have created a strong, firm base for your limbs to push off of and generate power. Think “proximal stiffness for distal strength” (or stable at the body for strong at the limbs).
In the photos below, I illustrate how to create tension in the lower extremity for squats using position and squeezing the stabilizer muscles of the hip. When you are attempting to do this, remember to brace the abdomen simultaneously.

Step 1 : plant the feet and keep them in a comfortable position for your body. For some people, this is pointing out with the toes 10 or 15 degrees, while for others straight ahead is comfortable throughout the squat.

Step 2 : rotate the shin outward, keeping the foot planted and the knee pointed in line with the toes. This will feel very strange at first, but is a very important motion to be able to do. When you rotate the tibia out like this, it tightens the foot and ankle into a string anchoring position and allows the knee joint to slide smoothly along the angle of the squat under the femur.

This step in particular can be hard to understand what you are trying to do. Your goal is to rotate the shin without sliding the knee out to the side too much, which will make the foot and ankle tighten up and help create the arch. In this comparison, I attached cups to the front of my shin in the same place so you can see the rotation in relation to the foot.

Step 3 : squeeze the hips (or gluteals, or butt, or cheeks - whatever you call them, just squeeze them) tightly. This action should make the thighs rotate out slightly as the hip joint gets pulled into place and ready to move.

Step 4 : take a deep breath and brace the abdomen. This should be like simultaneously preparing for a strike to the gut, flattening your lower back, and pulling your hips underneath your shoulders.
Once you have all these components in place and are holding them, you should be UNCOMFORTABLE. The most comfortable thing to do at this point should be to drop down into a squat. If you have done it correctly, it will almost feel like you have no choice but to slide down into a slot that you have created for yourself. Maintain as many of the squeezed body parts as you can to stand back up.
I encourage you to try it out and see if body weight squats become easier, or if you find that a normally challenging weight suddenly feels much less challenging.
Stay tuned for the next installment on creating tension in the upper extremity and in the deadlift. I will also show some methods for practicing creating tension using bands.

Dr. Paul Harris holds a Doctor of Chiropractic degree from Texas Chiropractic College and a Master’s of Exercise and Health Sciences from University of Houston Clear Lake. He is the owner of Delta V Chiropractic and Sports Medicine and an avid human movement specialist.
Tendinitis : What is it and how to fix it
A quick WebMD search for tendinitis can yield some disheartening results. The overall summary makes it sound like whatever body part hurts is going to fall off, need steroid injections, or be put back together with surgical thread and duct tape. Ok maybe not fall off, and maybe not duct tape — but the analysis of what tendinitis is makes it sound like it’s crippling and going to take you weeks to get back to doing what you want to do. It also makes it sound like your options for treating tendinitis are extremely limited and doesn’t seem like there’s much in the way of hope.
Well, that’s just not the case. There is a LOT you can do with tendinitis, and it doesn’t need to take weeks or months to go away.
Tendinitis ( or Tendonitis)

Tendinitis is an irritation and inflammation of a tendon, the connective tissue that attaches your muscles to your bones throughout your body. Usually, when someone says they “strained” or
“pulled” a muscle, this is actually what they are talking about. It often occurs when an abnormal load is placed on a normal tendon; when a normal load is placed on an abnormal tendon; or when the stress and demands placed on the tendon exceed what is capable of on a regular basis. It often presents as pain, tightness, and weakness of a muscle — especially when attempting to use the muscle. There may even be some swelling and tenderness to the touch.
Treating Tendinitis
In clinic, I follow this series of steps for treating a case of tendinitis : Relieve pain, Reduce irritation, Reprogram the movement, Return to strength. This program is not only effective, but much of it is given to my clients and performed at home.
Relieve Pain
Relieving pain in most cases of tendinitis is done in clinic through manual therapies and hands on soft tissue work, sometimes with the application of Rocktape as well. At home, this means using a foam roller, tennis ball, or similar type of self massage tool on the muscles that are sore and tight. The goal is to relieve some or most of the pain, not to fix the problem using just a foam roller — don’t get too focused on that part.
Reduce Irritation
Reducing the irritation on the tendon is where you will have to start making some changes in order to heal. This might mean taking time away from the activity that causes most of the pain, or changing your activities. It could also mean adding stretches or mobility work for tight muscles and movements. Other methods might be using tape or braces/wraps for a few days to support the joint or muscle. While you are reducing irritation on the tendon, some level of rest is usually helpful. However, instead of complete rest I recommend that you work through the movements in a lighter, controlled fashion. This lets you keep working the tendon and acclimating the muscle to loading without causing pain or further damage.
Reprogram The Movement
Reprogramming the movement either requires fixing a dysfunctional movement pattern, or altering the specifics of your training program. One way that I approach the dilemma is this : if it hurts or is uncomfortable to do one or two repetitions — you probably need to fix the pattern. Otherwise, there’s a good chance that you need to alter your training program.
Return To Strengthening
Returning to strength is the last step, and is an important step for making sure that the issue doesn’t resurface. In clinic this is when we discuss and teach movements and exercises that support the muscle or joint and how to make it stronger. Making the whole area and overall movement stronger greatly reduces the likelihood of another bout of tendinitis. I also like to add in eccentric exercises to help strengthen the tendons and connective tissue. It’s important not to try this step too early, as it will go right back to irritating the tendon if you are not careful.

Dr. Paul Harris holds a Doctor of Chiropractic degree from Texas Chiropractic College and a Master’s of Exercise and Health Sciences from University of Houston Clear Lake. He is the owner of Delta V Chiropractic and Sports Medicine and an avid human movement specialist.